
An overview of the temporary use.id authorization procedure
With the use.id authorization procedure, you as a developer, can ask a user to give access to his or her data to another party's WebID. For example, developers of My Move can ask Alice to give ABC Bank read access to her old and new address data.
To do this, the My Move developers need to undertake a procedure of three steps (see image below). First, you need to create an access request. Next, you have to present this request to the user and ask him or her for approval. Finally, you need to check the status of the access request to see whether it was successful or not.
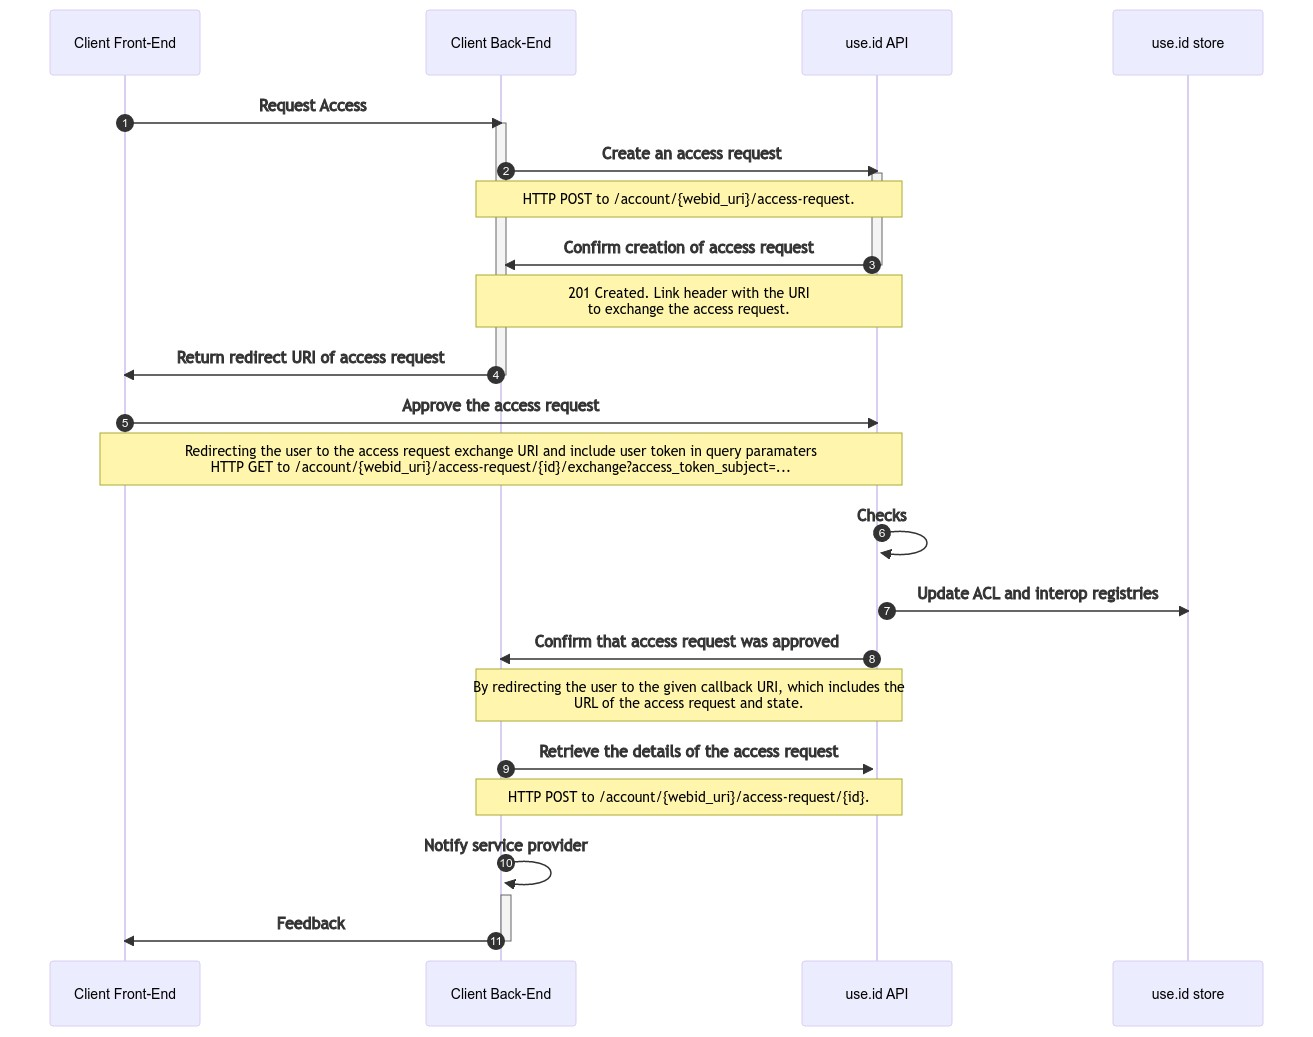
Figure 1: The procedure the developers of My Move use to ask a data subject to share data with another WebID.
The complete functionality is described in the API reference of api.use.id.
Implementing My Move's data sharing procedure
Let's see how the developers of My Move implemented the above procedure. Let's take the example in which we ask John to share his new address, old address, email and identity information with ABC Bank to support the user journey below.
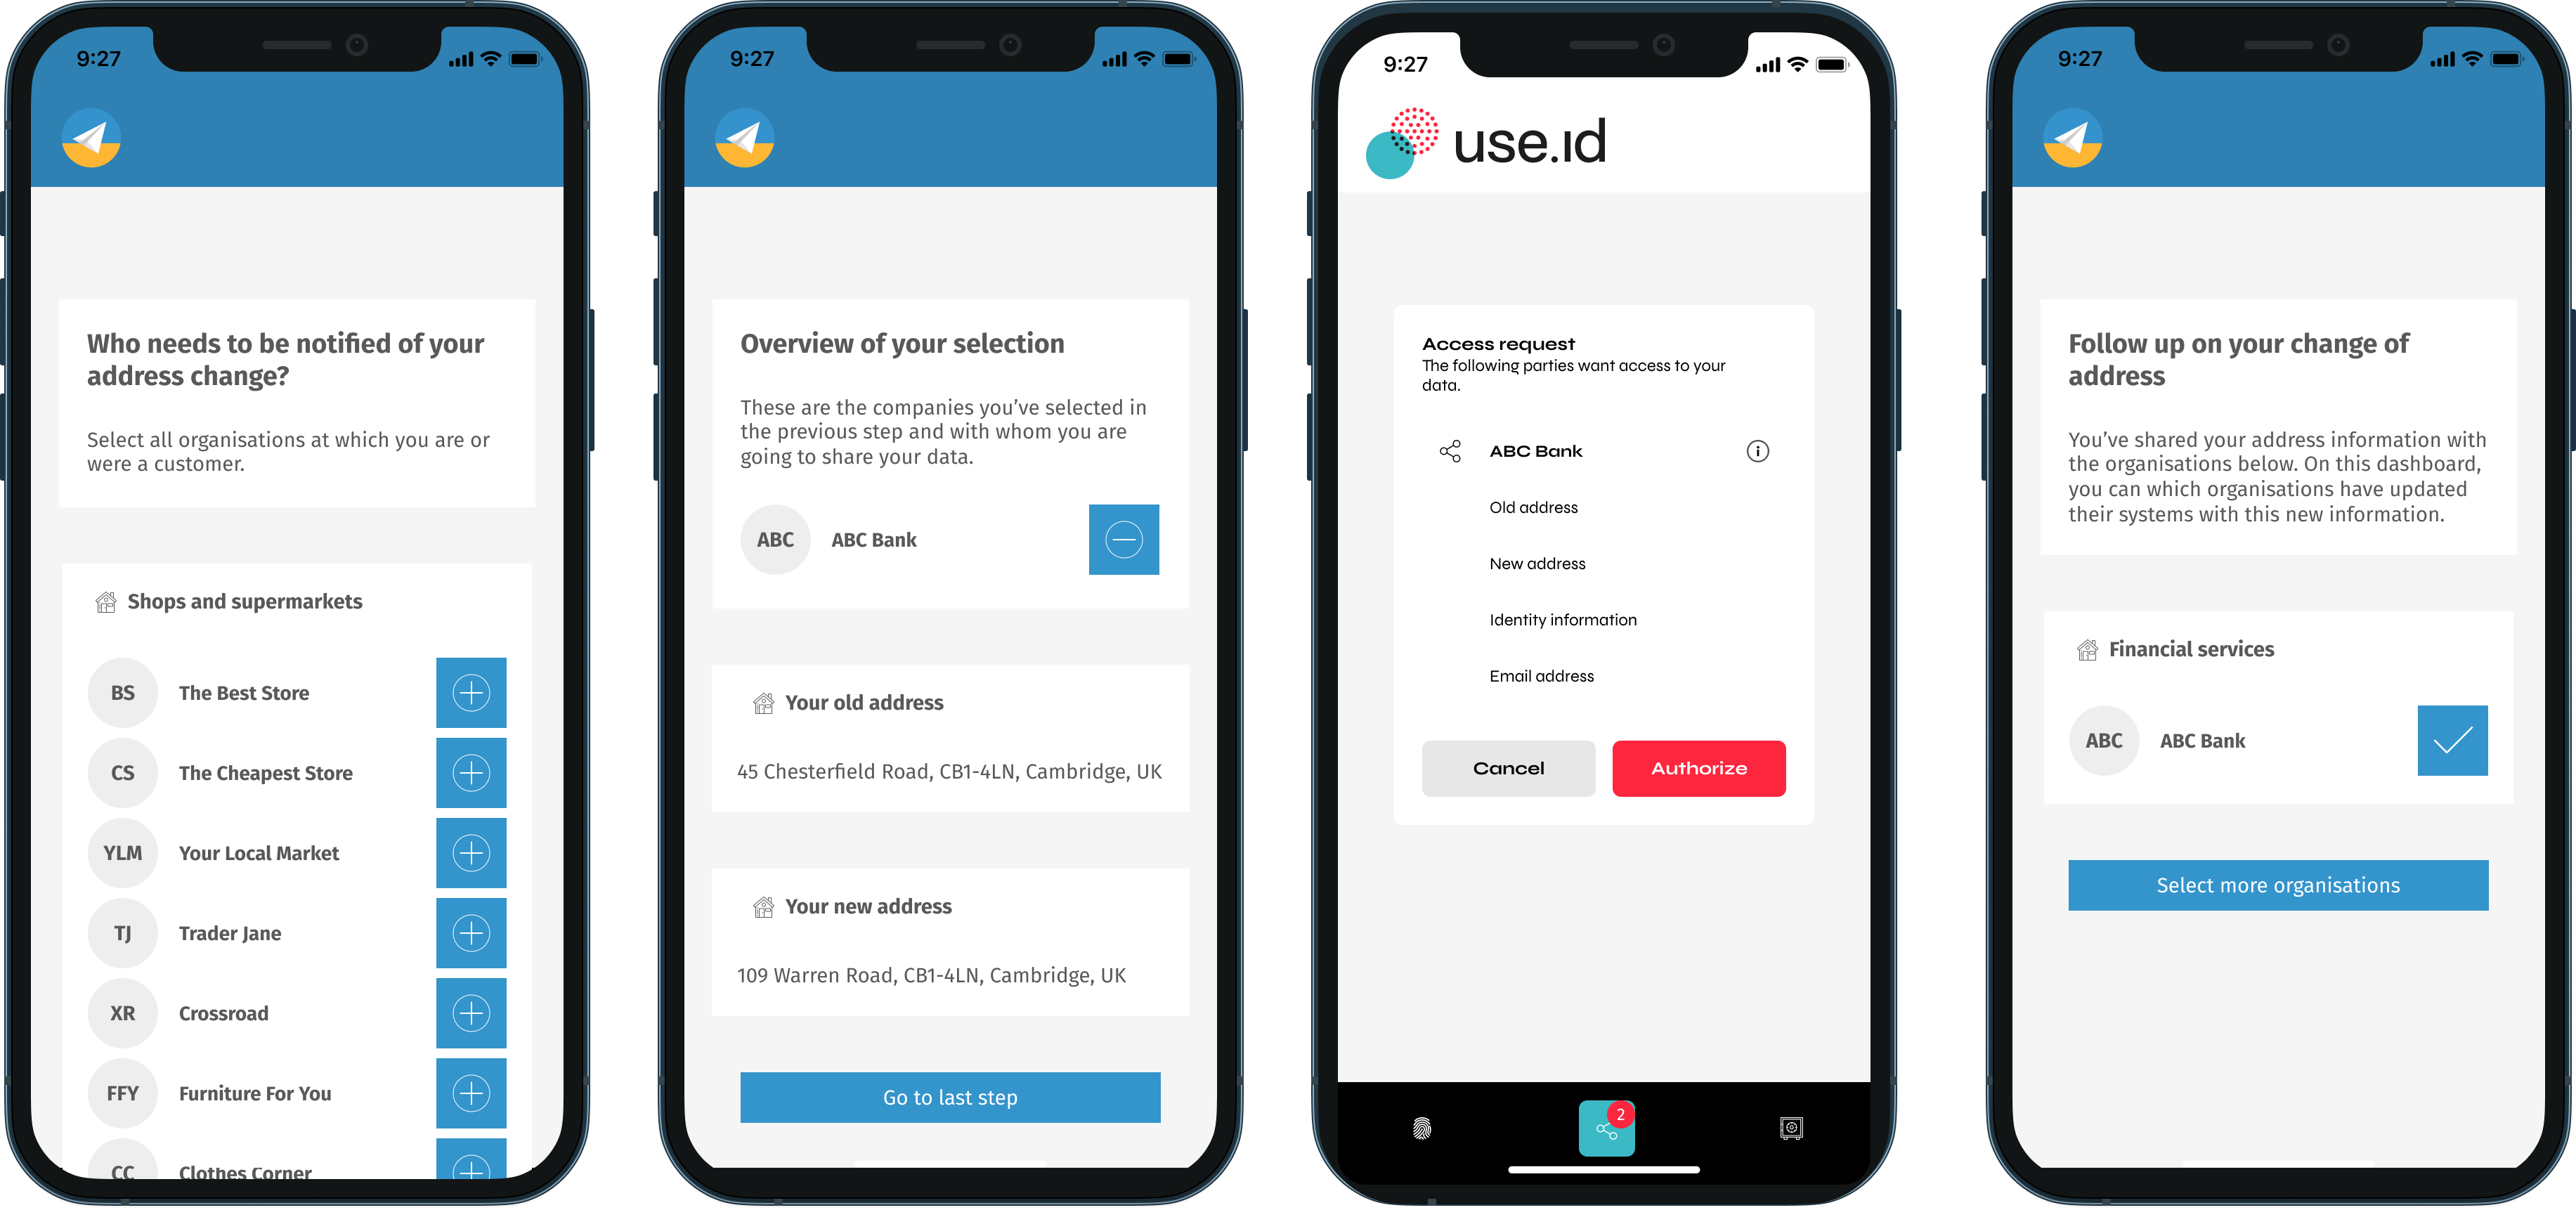
Figure 2: The journey that serves as an example for the calls in this tutorial
use.id specific fixes
The endpoints described in this procedure are preliminary implementations of an authorisation agent and are about to be deprecated soon. Nevertheless, these endpoints are designed to be as close as possible to what we believe will be the final interoperability specification and, moreover, these endpoints will receive legacy support for as long as needed.
In what follows, each step of Figure 2 is explained in more detail:
Step 1: The My Move front-end requests access to the My Move back-end
In this step, the front end of My Move signals to the My Move back-end that John has requested to share access to his data with ABC Bank. In this step, there is no interaction with the use.id API.
The back-end of My Move knows that the WebID of John is use.id/johnand that the WebID of ABC Bank is webid.abc-bank.com.
Step 2: The My Move back-end creates an access request using the use.id API
In this step, the back-end of My Move sends a POST request to use.id's /account/{webid_url}/access-requestto create the access request.
In this case, the actual request looks as follows
POST https://sandbox.api.use.id/account/https%3A%2F%2Fsandbox.use.id%2Fjohn/access-request
Authorization: DPoP eyJhbGciOiJFUzI1NiIsImtpZCI6IjI4YzBkODk5LTg0YTktNDUwOC1hYTliLTJhOTdlMjFmMjVmOCIsInR5cCI6ImF0K2p3dCJ9.eyJodHRwczovL3Rlc3QudXNlLmlkL3dlYmlkIjoiaHR0cHM6Ly90ZXN0LndlYmlkLmlub3guYXBwLyIsImlzcyI6Imh0dHBzOi8vdGVzdC5pZHAudXNlLmlkLyIsInN1YiI6Iml0TGtqYms3Rldpa01kQktkQ0hTVTJVQ0ZrS29iWXlaQGNsaWVudHMiLCJhdWQiOlsiaHR0cHM6Ly91c2VpZC10ZXN0LmV1LmF1dGgwLmNvbS9hcGkvdjIvIiwic29saWQiXSwiaWF0IjoxNjYwODEzODU2LCJleHAiOjE2NjA5MDAyNTYsImF6cCI6Iml0TGtqYms3Rldpa01kQktkQ0hTVTJVQ0ZrS29iWXlaIiwiZ3R5IjoiY2xpZW50LWNyZWRlbnRpYWxzIiwiY25mIjp7ImprdCI6ImJ0SUVlM21GbmpERW82VVpxeFh4RHhSUHhTdWpIZWlUQjV5U25sMVpUT28ifSwid2ViaWQiOiJodHRwczovL3Rlc3Qud2ViaWQuaW5veC5hcHAvIiwianRpIjoiZjZhYmQ5NTItM2E0Mi00NTdhLWE3MDEtYWQ4MTI5MDhkMTRiIn0.tZyG7QzSLckxIl6hOWW1EdLSi79tNSrEHo0GxHl1FX-J8W-uniKFFo7YvVnZ2H8-_sUtAwplLklhtUGitYyuNg
DPoP: eyJhbGciOiJFUzI1NiIsImp3ayI6eyJjcnYiOiJQLTI1NiIsImt0eSI6IkVDIiwieCI6Ik5tVjQ2UENzSndBOXFwdW4xeUtvckx0ejFodk4yU2ZKN3h0U2JSTlJQMHciLCJ5IjoiM0wyN040TjRXdy1QQWlXelV2alo2UXFvem9kUkRsUmJERERBU201cGdXbyJ9LCJ0eXAiOiJkcG9wK2p3dCJ9.eyJodG0iOiJQT1NUIiwiaHR1IjoiaHR0cHM6Ly90ZXN0LmFwaS51c2UuaWQvcHJvdmlzaW9uIiwiaWF0IjoxNjYwODEzODY3LCJqdGkiOiJjM2UxNjhmYi1kYmMwLTQ2OGEtYmFkNS02MWM0ZTk4NWI2MGQifQ.KLhm-1LBopY5iq2QHXPikZDnJ5CXeQUwAGCL-oI896o_gtyotzquQGG8QD1LjVQ_wirbvb6_zw3SilJ3EPiQgw
Content-Type: application/json

{
  "from_social_agent": "https://webid.abc-bank.com",
  "to_social_agent": "https://sandbox.use.id/john",
  "access_need_group_uri": "https://webid.mymove.app/access-needs-bank",
  "access_token_subject": "eyJhbGciOiJIUzI1NiIsInR5cCI6IkpXVCJ9.eyJzdWIiOiIxMjM0NTY3ODkwIiwibmFtZSI6IkpvaG4gRG9lIiwiaWF0IjoxNTE2MjM5MDIyfQ.SflKxwRJSMeKKF2QT4fwpMeJf36POk6yJV_adQssw5c",
  "redirect_uri": "https://app.mymove.app/redirect"
}
To learn how to format an access need group, take a look at the next page.
Step 3: The use.id API signals to the My Move backend that the access request is created
In step 3, the use.id API signals to the My Move back-end that the access request is ready to be exchanged.
HTTP/1.1 200 OK
Location: https://sandbox.api.use.id/account/access-request/https%3A%2F%2Fsandbox.use.id%2Fjohn/access-request/006fa824-c3ce-49f6-a88f-8d38cb3e187c
Link: <https://sandbox.api.use.id/account/access-request/https%3A%2F%2Fsandbox.use.id%2Fjohn/access-request/006fa824-c3ce-49f6-a88f-8d38cb3e187c/exchange>; rel="exchange"
The developers of My Move can reuse the Linkheader of this request to determine the URL for the request in the next step.
Step 4: The My Move back-end signals to the My Move front-end that the access request is created
This step does not require interaction with the use.id API. In this step the My Move back-end signals to the My Move front-end that the access request is ready to be exchanged. The front-end now knows that it has to redirect the user and is thus ready to proceed to step 5.
Step 5: The front-end redirects the user to approve the request
Now that My Move's front-end knows that the access request is ready to be exchanged, it redirects the user to the corresponding URL (for example in an iframe). It then waits until use.id redirects the user back to My Move.
GET https://sandbox.api.use.id/account/https%3A%2F%2Fsandbox.use.id%2Fjohn/access-request/006fa824-c3ce-49f6-a88f-8d38cb3e187c/exchange?access_token_subject=eyJhbGciOiJIUzI1NiIsInR5cCI6IkpXVCJ9.eyJzdWIiOiIxMjM0NTY3ODkwIiwibmFtZSI6IkpvaG4gRG9lIiwiaWF0IjoxNTE2MjM5MDIyfQ.SflKxwRJSMeKKF2QT4fwpMeJf36POk6yJV_adQssw5c
Step 6 & 7: use.id checks whether the access may be granted (or not)
Now, use.id will do several checks (e.g. check whether the user has accepted the request to share data). In case the user accepts the sharing request, use.id updates the access controls.
use.id temporary fix
Currently, the authorisation screen is blank and does not prompt the user for input. The actual screen will be implemented very shortly. Customers that currently expect a blank screen will receive legacy support.
Step 8: Confirm that the access request is exchanged
The use.id API will redirect the user back to the URL that was given before. Now the application knows that the access request was exchanged.
HTTP/1.1 302 Found
Location: https://app.mymove.app/redirect?access_request_url=https%3A%2F%2Fsandbox.api.use.id%2Faccount%2Fhttps%253A%252F%252Fsandbox.use.id%252Fjohn%2Faccess-request%2F006fa824-c3ce-49f6-a88f-8d38cb3e187c
Step 9: Check the status of the access request
My Move can check the status of the access request by doing the following API call:
GET https://sandbox.api.use.id/account/https%3A%2F%2Fsandbox.use.id%2Fjohn/access-request/006fa824-c3ce-49f6-a88f-8d38cb3e187c/
My Move then receives the following response:
HTTP/1.1 200 OK
Content-Type: application/json

{
  "from_agent": "https://webid.abc-bank.com",
  "to_agent": "https://use.id/john",
  "has_access_need_group": "https://webid.mymove.app/access-needs-bank",
  "granted_with": "https://webid.mymove.app",
  "granted_at": "2022-09-02T10:31:24.263Z",
  "state_of_access_request": "granted"
}
Step 10: Notify the recipient of the data
In this step, My Move notifies ABC Bank and tells them that they now have access to the data of John.
Step 11: Feedback
My Move redirects the user to the final screen.
Updated over 2 years ago